

A common question regarding Downward Facing Dog (Adho Mukha Svanasana) is how do I maintain straight legs, a straight back, and the sit bones lifted all at the same time? What is the priority, a straight back or straight legs?
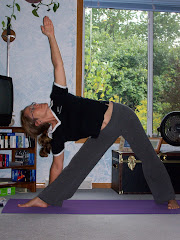
In the pictures, the gal to the left is rounding her back, lifting her head, and bending her elbows. All 3 of theses alignments are (in general) not healthy and can cause strain to the body. Notice the gal to the right. The spine is long and maintaining a natural low back curve. There is a definite extension from the hands to the sit bones. Her whole body is getting a great stretch.
Now the question is, how do you get there if your body won't cooperate?
First, take care of the back by having a long and "straight" spine be the highest priority. This might mean bending the knees or doing a modified down dog.
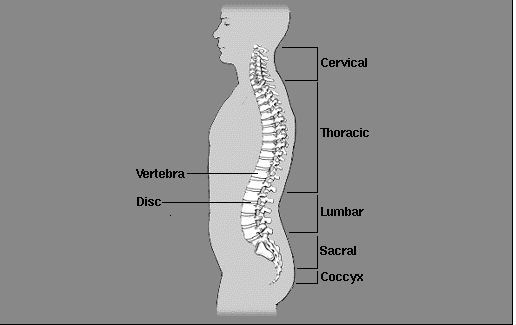
To maintain the natural lumbar (low back) curve and have straight legs requires flexibility in the hamstrings (backs of the legs). Over time it will come (barring some anatomical limitation). The priority is keeping the lumbar curve in order to lengthen the vertebrae and begin to release tension in the hamstrings. I'd recommend keeping the feet almost as wide as the mat (this is easier for the back to find it's natural curves) and bend the knees slightly. Focus on reaching the sit bones up towards the sky, as if there is a large hook on your pubic bone lifting it back and up :-) (Now, there's an image for you!) The inner thighs stay wide and lift skyward.
As flexibility grows, it's possible to lift the sit bones too high. When this happens the back will actually bow down towards the Earth, and/or you might feel pinching at the tops of the thighs near the pelvic bowl. This means it's time to, also, focus on scooping the tailbone towards the heels. A result of this action is a toning in the low belly and a lift from the pelvic floor toward the heart center. This action will bring length to the spine, while maintaining the lift of the sit bones.
Another method of working with down dog is to start with modified versions. (Note, just about ALL Yoga poses can be modified!!) This method opens the back body (hamstrings and low back) in a gentle and controlled fashion.

Start standing about 3-4 feet from a wall, facing it. Place hands on the wall (remember to lift the carpal tunnel--at the center of the wrist--away from the wall by rooting through the base of the index finger and thumb). Place your feet a comfortable distance apart. Maintain the natural curves in the spine and straight legs. If this is not possible, then move closer to the wall and lift the hands high enough that the elbows can straighten. If you can feel a stretch here, then do this 2 or 3 times a day for 1-3 minutes--great time to practice full breathing. You can make it a short meditation time :-) If you don't feel anything, then step a little further away from the wall and move the hands lower. Once you can do this and your torso is parallel to the ground (legs straight, spine holding natural curves, energy moving into the index finger and thumb base while lifting the base of the wrist away from the wall), then move the hands to a table/sofa/chair. Eventually, you'll be able to move the hands onto blocks and finally the floor.
If you have any questions or suggestions, please feel free to post them.
Have fun practicing!
Kris

1 comment:
I've also found, when students can't reach the floor with their heels, it helps to slip a rolled blanket under the lifted heels. Then they have something to ground into with the foot, and that support will help them lengthen behind the knees. Or they can rest their raised heels against the wall.
They instantly relax and deepen into the pose and stop straining so much. Maybe because it gives them permission to not touch the ground (even if they are told so verbally).
Nice, detailed post!
Post a Comment